1
PharmaSUG 2013 - Paper CC11
Combining SAS ® LIBNAME and VBA Macro to Import Excel ® file in an
Intriguing, Efficient way
Ajay Gupta, PPD Inc, Morrisville, NC
ABSTRACT
There are different methods such PROC IMPORT/LIBNAME to Import Excel file using SAS. While importing the data
in SAS, due to technical limitations these traditional methods might corrupt your data by applying their own automatic
formatting. Few examples are, importing column with mixed data types in numeric format or importing the regular
data containing hyphen/slash/colon/letter ‘e’ into date/time/scientific formats. The best way to avoid automatic
formatting is to import Excel data into pre-defined format for e.g. character. This paper will introduce a unique method
where Excel file is imported using a combination of Visual Basic for Applications (VBA) macro via Dynamic Data
Exchange (DDE) in SAS and SAS LIBNAME statement. This convenient and reliable solution will help SAS
Programmers/Statisticians to have better control over the quality of data and save significant time with minimal
coding.
INTRODUCTION
While SAS can import from a variety of formats, Excel files (XLS) are among the most common. Currently there are
many ways to import Excel data into SAS: The Import Wizard, PROC IMPORT, and using a LIBNAME statement.
But, due to technical limitations in SAS these traditional methods might create missing values while reading the
columns in Excel file containing mixed data types (both numeric and character). For e.g. we receive clinical lab data
from different vendors in Excel format which normally has the mixed data in the results column.
In particular, when the Excel file is large then it is hard to debug the loss of data. These methods mostly depend
upon SAS to decide the formats of the data and can create different attributes for similar variables when same Excel
file is read by different traditional methods. So, both programmer and validator might need to do some extra
programming to match the data which can be time consuming. If the header in the Excel file is not on the first line
then it will require further processing of the data to get the right header which might be time consuming. Due to the
above mentioned issues there is a desperate need for a new method to import Excel which can import the data
properly and programmers can predefine the variable formats with minimal coding.
In my previous paper, to meet the above challenge I had introduced a method to read excel using Microsoft Access.
However, previous method requires having Microsoft Access on your PC and also Access is not very popular among
the SAS programmers. There was a need to have a simpler and cost effective method with minimal interaction with
other system and SAS.
This paper introduces another useful (and probably simpler) method to import data from Excel file using SAS. For
Import, the entire process involves SAS, Excel VBA macro which is automated by a SAS macro called
%Convert_Excel2_SAS. It will import the entire contents while reserving the Excel layout and structures, including
tables with multiple columns, into SAS data. Since variable formats will be predefined as character using the VBA
macro, this will avoid any formatting changes occur to the data during the conversion process. In this macro the user
can define the line number containing the header and the macro will assign the header variables from the given line
number.
TECHNIQUE & MECHANISM
The general process to convert an Excel file into a SAS dataset is as follows (note that the first item is a one-time
setup, and the rest can be managed via SAS code):
1. Record a macro ‘IMPORT’ in Excel which will perform the following functions:
Open the target file in Excel and insert a line on the row one. After insertion you will have a blank line on row
one.
Insert a character for e.g. ‘C’ in blank row (here less than 256 columns). This will later help to predefine
Excel column as character.
Save the macro in Personal.xls and stop recording.
2. Open the relevant Excel file ‘Raw.xls’ and execute the VBA macro ‘IMPORT’. The updated Excel file will have an
extra first row with character ‘C’. Further, save the Excel as ‘Raw_1’.xl
Combining SAS ® LIBNAME and VBA Macro to Import Excel ® file in an Intriguing, Efficient way, continued
2
3. Read the content from ‘Raw_1’.xls into SAS using LIBNAME procedure using HEADER=’No’ and MIXED=’Yes’.
This will allow SAS to read all the columns as character which will eventually prevent any data conversion.
4. Execute macro %Excel_Header to get header from Excel file and remove first row from dataset. Also, this macro
will get rid of blank rows and columns.
5. Delete the ‘Raw_1.xls’ from the production location.
6. Compare the original file with ‘Raw_1’.xls. This step is optional.
To automate these steps, the DDE solution is leveraged to build the communication bridge between SAS v9.1.3 and
Excel 2003. Excel v4.0 macro functions (Microsoft Corporation, 2000) can be sent from SAS via DDE to enable SAS
to take control of Excel.
RECORD VBA MACRO IN EXCEL TO INSERT A CHARACTER
For many, perhaps most SAS developers the easiest and fastest way to write VBA code is to first go into a Microsoft
application (in this paper Microsoft Excel is used as the application), turn on the macro recorder, perform the steps
and functions desired, and then terminate the macro recorder. The end result is a stored VBA program (macro) that
can be executed at a later date. This makes it possible for a SAS developer to automate tasks in the Microsoft
application, and therefore vastly improve the functionality of an integrated system that takes advantage of the relative
strengths of the SAS System and the Microsoft application.
Steps to record VBA Macro are as follows:
1. Open Excel.
2. Select Tools, Macro, and Record New Macro from the pull down menus.
3. Enter the name of macro as ‘IMPORT’.
4. Select Ok. Make sure to store the macro in Personal Macro Workbook.
5. Select first cell A1. Right click and go to ‘Insert’ and then select entire row.
6. Select Ok. This will insert a blank row on the top.
7. Add a character ‘C’ on the entire columns of first row or require columns of first row using copy/paste
commands.
8. Select the stop recording button.
9. Close the Excel and saved the macro in the Personal Macro Workbook.
OPEN THE TARGET FILE IN EXCEL AND EXECUTE THE VBA MACRO
In order for a client/server communication link to be established, both SAS and Excel must be running. Therefore, for
the first iteration, it is necessary to programmatically launch Excel from a SAS session. There are several techniques
available to launch Excel from SAS. The simplest one is the following statement:
%LET RC=%SYSFUNC(SYSTEM(START EXCEL));
The above command is dependent on the completion of previous commands. Note, the SLEEP function can be used
frequently in the SAS command/datastep that is dependent upon completion of previous jobs. This will help avoid
errors from occurring due to delays in the execution of previous SAS commands/data steps.
The syntax for the SLEEP function is given below:
DATA _NULL_;
x=SLEEP(5);
RUN;
The above step will pause the SAS session for five seconds.
To communicate with Excel from SAS, the following FILENAME statement is used to establish the linkage between
SAS and Excel via the DDE triplet:
FILENAME EXCEL DDE 'EXCEL|SYSTEM';
The next step is to open the target file “&in” by sending the OPEN command to Excel with a
DATA _null_ step. Once the file is open in Excel, execute the excel macro ‘Import’ and further save the file as
‘Raw_1.xls’ as shown in the following:

Combining SAS ® LIBNAME and VBA Macro to Import Excel ® file in an Intriguing, Efficient way, continued
3
DATA _NULL_;
FILE excel;
PUT '[ERROR(false)]';
PUT '[OPEN("' "&in" '")]';
PUT '[RUN("personal.xls!import")]';
PUT '[SAVE.AS("' "&location\raw_1.xls" '")]';
PUT '[FILE.CLOSE()]';
PUT '[QUIT()]';
RUN;
It is necessary to programmatically close the document with the CLOSE command. Further, the QUIT command will
exit Microsoft Excel.
READ THE CONTENT INTO SAS USING LIBNAME PROCEDURE
After the text or data is saved into an Excel, it is time to read it into SAS by using the LIBNAME
Statement. If the SAS\ACCESS license is available, the following libname can be used:
LIBNAME xls excel "&location\Raw_1.xls" HEADER=no MIXED=yes;
LIBNAME dat "&location";
DATA dat.&out.;
SET test.”$Sheet1”n (firstobs=2);
RUN;
In the above datastep, “&location” is the production location and “&out” is the output dataset created and saved in
library “dat”.
GET HEADER FROM THE EXCEL FILE BY EXCEUTING MACRO %EXCEL_HEADER
If the Excel file has header variables then the following macro %Excel_Header will rename the variables from SAS
dataset with the one from Excel.
There are only two keyword parameters if used independently:
Header_num: Line number for header for e.g 1.
Special: Delete any special character from header variable for e.g. ‘%’.
Below is the simple macro call to %Excel_Header.
%Excel_Header(header_num=, special=);
DELETE THE RAW_1.XLS FROM PRODUCTION LOCATION
To avoid any overwriting of the data, EXCEL file can be deleted as follows:
FILENAME db "&location\Raw_1.xls";
%LET RC=%SYSFUNC(FDELETE(db));
FILENAME db clear;
“&location” is the production location.
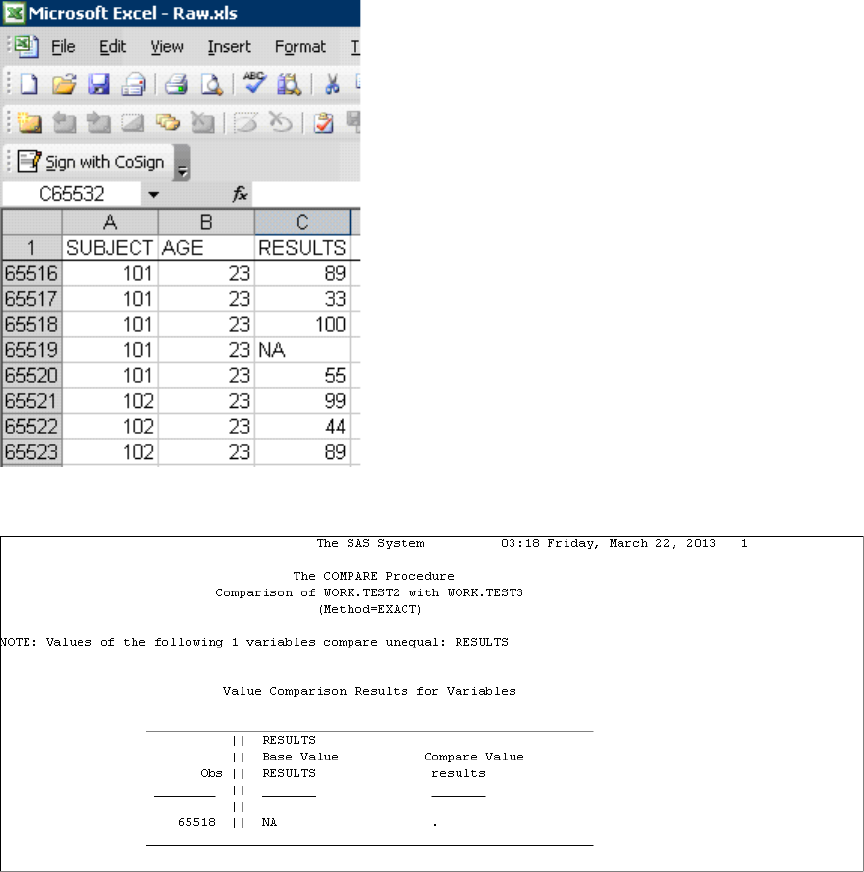
COMPARISON BETWEEN THE RAW.XLS EXCEL AND RAW_1.XLS:
Finally, the original file Raw.xls having mixed data is imported in SAS and further compared with the SAS dataset
created by the above macro using Raw_1.xls. Below is the screen shots of Raw.xls and compare procedure which
clearly indicates that the above discuss macro has captured a character value ‘NA’ which was initially detected
missing.
Combining SAS ® LIBNAME and VBA Macro to Import Excel ® file in an Intriguing, Efficient way, continued
4
Display 1. Screen shot of Raw.xls containing mixed data.
Output 1. Proc Compare Output.
%Convert_Excel2_SAS
To facilitate and automate the above discussed steps from opening the Excel file to reading the Excel file into SAS,
a SAS macro called %Convert_Excel2_SAS was developed for SAS v9.1.3 or above. The user can easily extend the
macro to fit other SAS versions.
There are only five keyword parameters:
In: Define the path and the name of the input Word file, e.g., C:\Demo\test.xls.
Out: Define the SAS dataset name, for e.g., raw.
Location: Production Location, for e.g., C:\Demo.
Header: Need header for e.g. Y or N.
Header_num: Line number for header for e.g. 1.
Special: Delete any special character from header variable for e.g. ‘%’.
Below is the simple macro call to %Convert_Excel2_SAS.
%Convert_Excel2_SAS (in= C:\Demo\test.xls, out=raw, location=C: \Demo,
header=,header_num=,special=);

Combining SAS ® LIBNAME and VBA Macro to Import Excel ® file in an Intriguing, Efficient way, continued
5
CONCLUSION
%Convert_ExceL2_SAS can convert the Excel into SAS datasets without any manual pre-process. Since variable
formats are predefined using VBA macro, this will avoid any formatting changes from occurring to the data during the
conversion process. Hence, the integrity of keeping the original content (including special characters) and structure of
Excel is guaranteed.
REFERENCES
Gupta Ajay, 2011. Reading Title and Footnote from RTF Output into SAS® utilizing Microsoft® Excel. Proceedings of
the PharmaSUG 2011 Conference, paper CC11.
Gupta Ajay, 2012. Importing Excel ® File using Microsoft Access ® in SAS ®. Proceedings of the PharmaSUG2012
Conference, paper CC07.
Roper, C.A. 2000. Using SAS and DDE to execute VBA macros in Microsoft Excel. Proceedings of the Twenty-Fifth
Annual SAS Users Group International Conference, paper 98.
Excel 4.0 Macro Reference. http://www.microsoft.com/downloads/en/details.aspx?FamilyID=00D31943-3AD1-4DF1-
9F93-C19C7E84F01C&displaylang=en
ACKNOWLEDGMENTS
Thanks to Ragini Hari and Anita George for their review and comments. Thanks to my wife Neha and my Mother in
Law for motivating me to write this paper. Special Thanks to my son Advait for keeping me awake while writing this
paper.
CONTACT INFORMATION
Your comments and questions are valued and encouraged. Contact the author at:
Name: Ajay Gupta, M.S
Enterprise: PPD Inc.
Address: 3900 Paramount Parkway
City, State ZIP: Morrisville, NC-27560
Work Phone: (919) -456-6461
SAS® and all other SAS® Institute Inc. product or service names are registered trademarks or trademarks of SAS®
Institute Inc. in the USA and other countries. ® indicates USA registration.
Other brand and product names are trademarks of their respective companies.

Combining SAS ® LIBNAME and VBA Macro to Import Excel ® file in an Intriguing, Efficient way, continued
6
APPENDIX
%MACRO Convert_Excel2_SAS(in=, out=raw, location=,
header=,header_num=,special=);
OPTIONS NOXWAIT NOXSYNC;
%LET RC=%SYSFUNC(SYSTEM(START EXCEL));
DATA _NULL_;
x=SLEEP(10);
RUN;
FILENAME EXCEL DDE 'EXCEL|SYSTEM';
DATA _NULL_;
FILE excel;
PUT '[ERROR(false)]';
PUT '[OPEN("' "&in" '")]';
PUT '[RUN("personal.xls!import")]';
PUT '[SAVE.AS("' "&location\raw_1.xls" '")]';
PUT '[FILE.CLOSE()]';
PUT '[QUIT()]';
RUN;
DATA _NULL_;
x=SLEEP(10);
RUN;
LIBNAME XLS excel "&location\raw_1.xls" HEADER=no MIXED=yes;
DATA &out._raw;
SET XLS."sheet1$"n(FIRSTOBS=2);
RUN;
LIBNAME xls clear;
%IF &header="Y" %THEN %DO;
%MACRO excel_header;
DATA header;
SET &out._raw (FIRSTOBS=&header_num OBS=&header_num);
RUN;
PROC TRANSPOSE DATA=header OUT=header2;
var _ALL_;
RUN;
DATA header2;
SET header2;
IF MISSING(col1) THEN DELETE ;
col1=STRIP(COMPRESS(col1,&special.));
col1=TRANSWRD(STRIP(col1),' ' ,'_');
RUN;
PROC SQL NOPRINT;
SELECT COUNT(*) INTO:n FROM header2;
SELECT col1 INTO:file1-:file%CMPRES(&n)
FROM header2;
SELECT _name_ INTO:file11-:file1%CMPRES(&n)

Combining SAS ® LIBNAME and VBA Macro to Import Excel ® file in an Intriguing, Efficient way, continued
7
FROM header2;
QUIT;
DATA &out.;
SET &out._raw(FIRSTOBS=%SYSEVALF(&header_num+1));
RENAME
%DO i=1 %TO &n;
&&File1&i=&&file&i
%END;;
RUN;
DATA &out.;
SET &out.;
LABEL
%DO i=1 %TO &n;
&&File&i="&&file&i"
%END;;
KEEP
%DO i=1 %TO &n;
&&File&i
%END;;
RUN;
%MEND excel_header;
%excel_header;
%END;
FILENAME db "&location\Raw_1.xls";
%LET RC=%SYSFUNC(FDELETE(db));
FILENAME db CLEAR;
%MEND Convert_Excel2_SAS;
